Other posts in this series:
- Part One
- Part Two (this post)
- Part Three
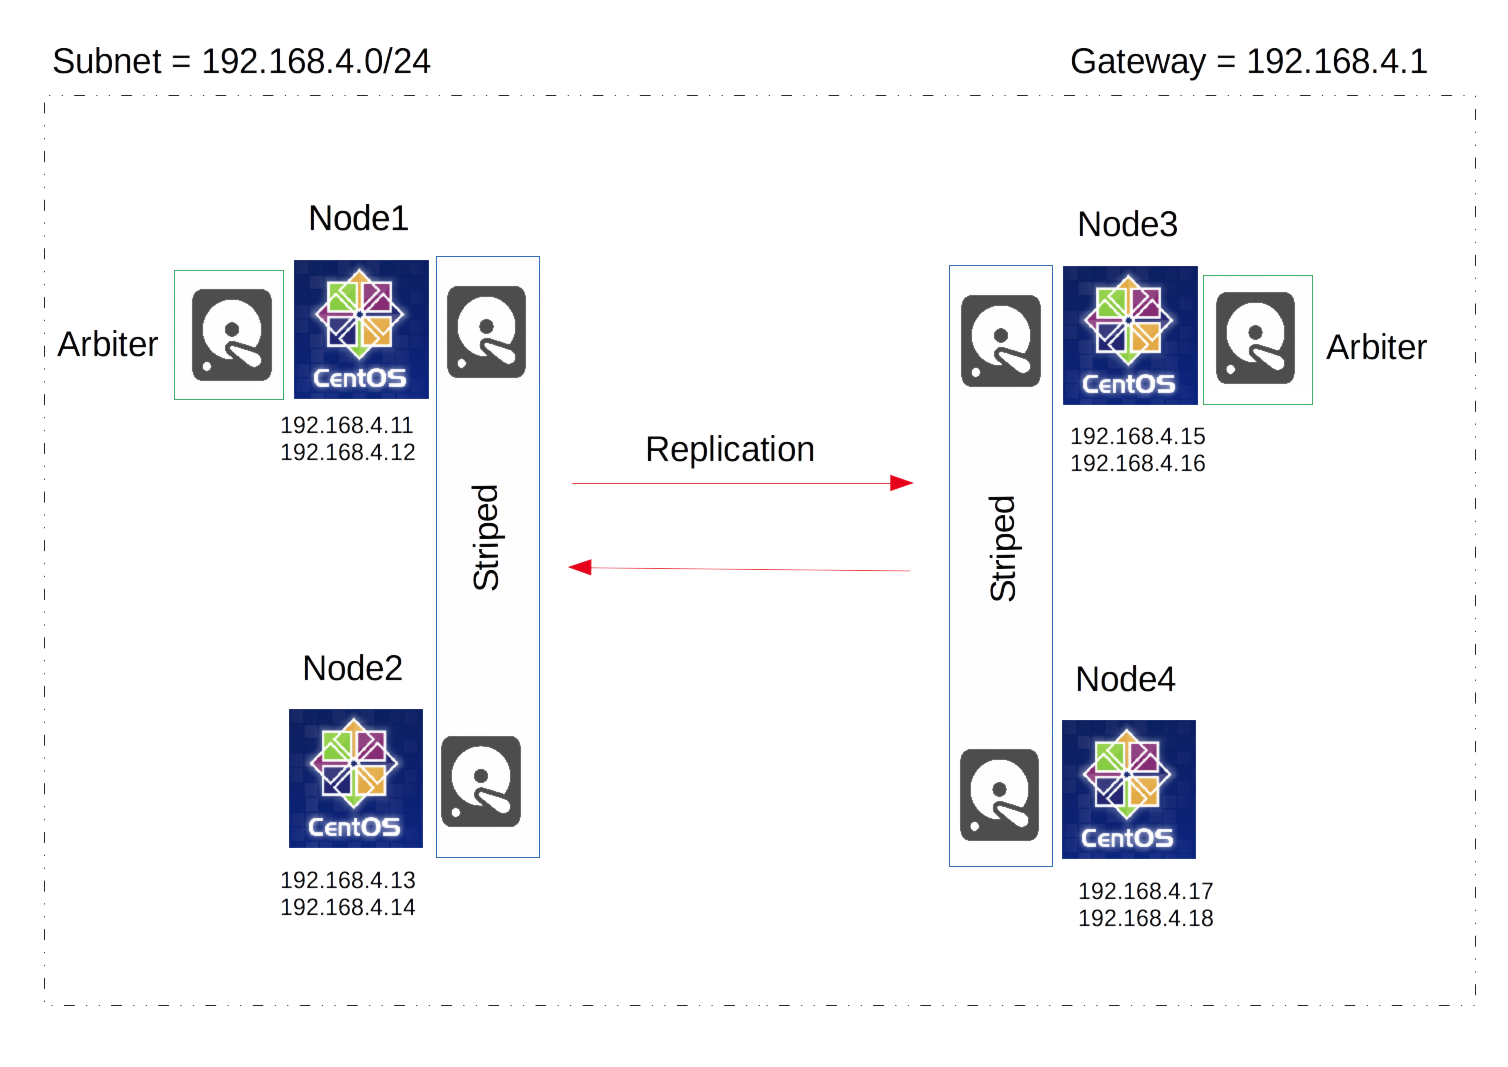
Hello again! Today on pebkac we are expanding on our two node GlusterFS from last time taking in some of the feedback I received. We will expand the cluster out to four nodes; we will stripe two of the nodes and replicate the striped volumes to the other two nodes, we will be implementing Linux Volume Manager (LVM), we will have two arbiter disks and trying not to mix in deprecated commands. If you’d like a better guide to getting started with gluster + ganesha, I would suggest going back to my original post, or even further back to kkeithley’s post which describes the first few steps well.
Versions:
- Centos-release: 7-3.1611.el7.centos.x86_64
- Kernel: 3.10.0-514.el7.x86_64
- NFS-Ganesha: 2.4.5-1.el7.x86_64
- NFS-Ganesha-Gluster: 2.4.5-1.el7.x86_64
- Glusterfs-Ganesha: 3.10.3-1.el7.x86_64
Starting with four centos7 nodes in the same subnet, all with a second disk/drive at /dev/sdb, and two of them (Node1 and Node3) with a third equally sized drive at /dev/sdc (the arbiter disks). See my Architecture diagram below:
On each node, configure your network interface (NiC), and a virtual IP for that interface to match the above IP address’. To configure a virtual IP, create another NiC config file with “:1” appended, in the same location as your original NiC config file, as below.
My config files for the NiC’s’ on Node1, NiC’s on Node2, NiC’s’ on Node3 and NiC’s on Node4 My files are designed for a 192.168.4.0/24 subnet with a gateway of 192.168.4.1. Run the following commands on all nodes, replacing the contents of the files with my configs linked above.
sudo vi /etc/sysconfig/network-scripts/ifcfg-ens160
sudo vi /etc/sysconfig/network-scripts/ifcfg-ens160:1
sudo ifup ifcfg-ens160:1
sudo systemctl restart network
You should be able to ping the virtual IP’s now. Run this on any node.
ping 192.168.4.12
ping 192.168.4.14
ping 192.168.4.16
ping 192.168.4.18
Configure your /etc/hosts file with the IP’s and Virtual IP’s of all the nodes intended for the cluster; you can see my /etc/hosts file.. Run this on all nodes, and replace the contents with my host file.
sudo vi /etc/hosts
Here I turn off the firewalld service. Warning: This is not, best practice, you should make exceptions on the FW for all the nodes in the cluster. Run this on both nodes.
sudo systemctl stop firewalld.service
sudo chkconfig firewalld off
Here we stop NetworkManager and keep it off. Run this on both nodes.
sudo systemctl stop NetworkManager
sudo chkconfig NetworkManager off
Then we enable the network service. Run this on both nodes.
sudo systemctl start network
sudo chkconfig network on
Now we need to install all the following packages. You don’t need nano, but it’s my preferred editor. Run this on all nodes.
sudo yum -y install centos-release-gluster
sudo yum -y install glusterfs-server
sudo yum -y install glusterfs-ganesha
sudo yum -y install nano
sudo yum -y update
Start the gluster service, ensure it is always started, then check the status. Run this on both nodes.
sudo systemctl enable glusterd
sudo systemctl start glusterd
sudo chkconfig glusterd on
sudo systemctl status glusterd
Here we setup passwordless ssh between the nodes, you have to enter the root account password 4 times. Run the following from Node1.
sudo ssh-keygen -f /var/lib/glusterd/nfs/secret.pem
sudo ssh-copy-id -i /var/lib/glusterd/nfs/secret.pem.pub root@Node1
sudo ssh-copy-id -i /var/lib/glusterd/nfs/secret.pem.pub root@Node2
sudo ssh-copy-id -i /var/lib/glusterd/nfs/secret.pem.pub root@Node3
sudo ssh-copy-id -i /var/lib/glusterd/nfs/secret.pem.pub root@Node4
sudo scp /var/lib/glusterd/nfs/secret.* Node1:/var/lib/glusterd/nfs/
sudo scp /var/lib/glusterd/nfs/secret.* Node2:/var/lib/glusterd/nfs/
sudo scp /var/lib/glusterd/nfs/secret.* Node3:/var/lib/glusterd/nfs/
sudo scp /var/lib/glusterd/nfs/secret.* Node4:/var/lib/glusterd/nfs/
You can then confirm passwordless ssh. Run the following from Node1.
ssh -oPasswordAuthentication=no -oStrictHostKeyChecking=no -i/var/lib/glusterd/nfs/secret.pem root@Node2
We then build the gluster cluster. Do this from Node1.
gluster peer probe Node2 Node3 Node4
gluster peer status
Enable the Gluster shared state volume. Do this on Node1.
gluster volume set all cluster.enable-shared-storage enable
Wait for gluster_shared_volume to mount on all the nodes, the below code should show a volume mounted to /var/run/gluster/shared_storage/ on every node before proceeding.
mount | grep gluster_sha*
Create the ganesha.conf and ganesha-ha.conf files on Node1.
My files:
Ganesha.conf
Ganesha-ha.conf
sudo mkdir /var/run/gluster/shared_storage/nfs-ganesha
sudo nano /var/run/gluster/shared_storage/nfs-ganesha/ganesha.conf
sudo nano /var/run/gluster/shared_storage/nfs-ganesha/ganesha-ha.conf
Enable and start the Pacemaker pcsd. Run this on all four nodes.
sudo systemctl enable pcsd
sudo systemctl start pcsd
sudo chkconfig pcsd on
sudo systemctl status pcsd
Set a password (in this case demopass) for the user ‘hacluster’. Use the same password, run this on all four nodes.
sudo echo demopass | passwd --stdin hacluster
Perform cluster auth between the nodes, run the below code from Node1. You need to enter the username “hacluster” and the password you set above in this case “demopass”.
sudo pcs cluster auth Node1
sudo pcs cluster auth Node2
sudo pcs cluster auth Node3
sudo pcs cluster auth Node4
Thats all for today, join me Next Time where we create the volume manager and export the NFSGanesha share.